在iOS开发中,聊天功能常常遇到,而聊天页里面图片相关的功能,一般包括
从相册选择照片发送
照片展示在聊天列表
点击列表里面的照片进行预览
在SDK中,是直接获取到相册框架返回的image,进行缓存,在聊天列表取缓存赋值到imageView上,这样做存在以下问题
- 内存占用过大,内存小的手机容易崩溃
- 列表上图片较多时,滑动会有卡顿
这篇文章来探讨一下这些功能相关的优化。
从相册选择照片发送
我们要确保选择完成之后,相册框架的资源要清理掉。之前是由相册框架去系统相册获取图片数据,我们改为由自己在照片选择完成之后去系统相册获取图片数据,这样可以降低一些内存占用
1
2
3
4
5
6
7
8
9
10
11
12
13
14
15
16
17
| PHImageRequestOptions *option = [[PHImageRequestOptions alloc] init];
option.deliveryMode = PHImageRequestOptionsDeliveryModeHighQualityFormat;
[photoList enumerateObjectsUsingBlock:^(HXPhotoModel * _Nonnull obj, NSUInteger idx, BOOL * _Nonnull stop) {
[[PHImageManager defaultManager] requestImageDataForAsset:obj.asset options:option resultHandler:^(NSData * _Nullable imageData, NSString * _Nullable dataUTI, UIImageOrientation orientation, NSDictionary * _Nullable info) {
BOOL downloadFinined = (![[info objectForKey:PHImageCancelledKey] boolValue] && ![info objectForKey:PHImageErrorKey] && ![[info objectForKey:PHImageResultIsDegradedKey] boolValue]);
if (downloadFinined && imageData) {
UIImage *image = [UIImage imageWithData:imageData];
if (!original) {
image = [image zd_scaleImagetoScale:0.6];
}
[arr addObject:image];
}
if (idx == photoList.count - 1) {
[self sendImageMessageArray:arr];
}
}];
}];
|
照片展示在聊天列表
优化前,聊天列表中展示的照片是照片原图,它的大小通常非常大,而且对它进行缓存非常占用内存,所以,我们可以通过下采样,将图片转化为小图,然后进行缓存并展示
图片解码
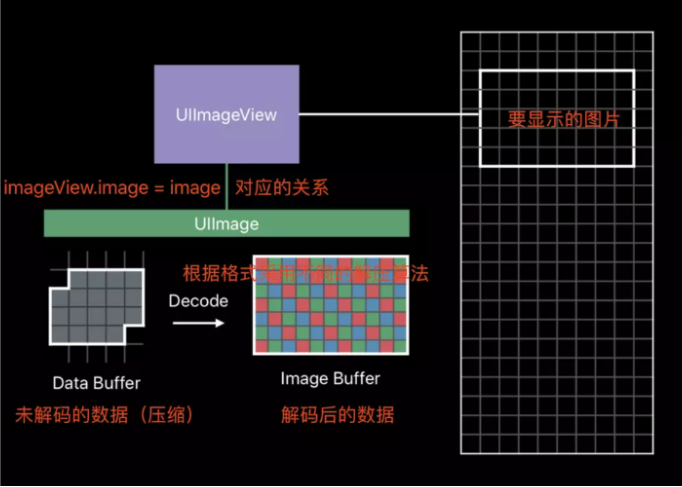
图片解码,指的是将已经编码过的图像封装格式的数据,转换为可以进行渲染的图像数据。简单来说,就是将普通的二进制数据(存储在dataBuffer)转化为RGB的数据(存储在imageBuffer)。也就是 dataBuffer → imageBuffer。
图片解码的时机是在:
当你用 UIImage 或 CGImageSource 的那几个方法创建图片时,图片数据并不会立刻解码。图片设置到 UIImageView 或者 CALayer.contents 中去,并且 CALayer 被提交到 GPU 前,CGImage 中的数据才会得到解码。这一步是发生在主线程的,并且不可避免。如果想要绕开这个机制,常见的做法是在后台线程先把图片绘制到 CGBitmapContext 中,然后从 Bitmap 直接创建图片。目前常见的网络图片库都自带这个功能。
图片解码是比较消耗性能的,容易造成卡顿。下面我试试图片解码到底有多卡,我拿了10张超过1MB的图片进行测试。代码很简单,就是一个tableView,在cell里面显示图片。
1
2
3
4
5
6
7
8
9
10
11
12
13
14
15
16
17
18
| - (UITableViewCell *)tableView:(UITableView *)tableView cellForRowAtIndexPath:(NSIndexPath *)indexPath
{
UITableViewCell *cell = [tableView dequeueReusableCellWithIdentifier:@"cell"];
if(!cell)
{
cell = [[UITableViewCell alloc] initWithStyle:UITableViewCellStyleDefault reuseIdentifier:@"cell"];
UIImageView *headImageView = [[UIImageView alloc] initWithFrame:CGRectMake(10, 6, 80, 100-12)];
headImageView.tag = 10;
[cell.contentView addSubview:headImageView];
}
NSString *fileName = [NSString stringWithFormat:@"Start%zi",indexPath.row%12];
UIImage *image = [UIImage imageNamed:fileName];
UIImageView *imageView = [cell.contentView viewWithTag:10];
imageView.image = image;
return cell;
}
|
1、通过imageNamed加载图
1
2
3
| UIImage *image = [UIImage imageNamed:fileName];
UIImageView *imageView = [cell.contentView viewWithTag:10];
imageView.image = image;
|
2、通过imageWithContentsOfFile加载图片
1
2
3
4
| NSString *path = [[NSBundle mainBundle] pathForResource:fileName ofType:@"png"];
UIImage *image = [UIImage imageWithContentsOfFile:path];
UIImageView *imageView = [cell.contentView viewWithTag:10];
imageView.image = image;
|
两种加载方式,一开始都是比较卡,好像imageNamed方式有缓存,后面再滑动tableView不卡了,因为缓存了解码后的图片。但imageWithContentsOfFile这种方式,一直都是卡顿,证明没有缓存,每次显示都进行了一次解码。
给imageView.image赋值时候,才会发生图片解码,如果不执行这代码,发现没产生什么卡顿,证明imageNamed等的图片加载方法耗时不多,主要的耗时操作是在解码阶段。
所以我们要针对解码做优化,将解码操作放到子线程,然后将解码后的图片进行缓存
下采样
当image素材大小是1000*1000,但是在手机上显示出来只有200*200,我们其实是没必要将1000*1000的数据都解码的,只需要缩小成200*200的大小即可,这样子节省了内存和CPU,用户感官也没有什么影响,这个过程就叫做下采样(downSampling)。
实现下采样大致分为以下五种API:
- UIKit,
UIGraphicsImageRenderer 或 UIGraphicsBeginImageContext
- CoreGraphics / Quartz 2D,位图上下文
CGContextScaleCTM 和 CGContextDrawImage
- ImageIO,创建省略图
CGImageSourceCreateWithData 和 CGImageSourceCreateThumbnailAtIndex
- CoreImage,滤镜
CILanczosScaleTransform
- Accelerate,vImage
CGBitmapContextCreate 和 CGContextDrawImage
关于这五种方案的比较,网上有文章介绍,大家有兴趣可以了解,这里我选择第一种 UIKit 的方式
1
2
3
4
5
6
7
8
9
10
11
12
13
| if (@available(iOS 10.0, *)) {
CGSize size = CGSizeMake(viewSize.width, viewSize.height);
UIGraphicsImageRenderer *renderer = [[UIGraphicsImageRenderer alloc] initWithSize:size];
return [renderer imageWithActions:^(UIGraphicsImageRendererContext * _Nonnull rendererContext) {
[self drawInRect:CGRectMake(0, 0, size.width, size.height)];
}];
} else {
UIGraphicsBeginImageContext(CGSizeMake(self.size.width * scale, self.size.height * scale));
[self drawInRect:CGRectMake(0, 0, self.size.width * scale, self.size.height * scale)];
UIImage *image = UIGraphicsGetImageFromCurrentImageContext();
UIGraphicsEndImageContext();
return image;
}
|
同时,UIKit的API 也会将图片进行解码,这样我们得到了下采样并且解码后的图片,然后将它进行缓存。对于这个操作过程,我们需要将它放到子线程中,使用一个专门的队列来管理它
1
2
3
| dispatch_async(self.downSamplingQueue, ^{
[[ZDImageCacheManager sharedDefaultCache] storeImage:[image ZD_downSamplingForChat] forKey:key completion:nil];
});
|
图片缓存
下采样之后的图片相比于从相册中选出来的图片,大小要小很多,所以我们的缓存策略是
| 小图(下采样后的图片) |
内存缓存 |
| 大图(相册返回的图片) |
磁盘缓存 |
1
2
3
4
5
6
| dispatch_async(self.downSamplingQueue, ^{
[[ZDImageCacheManager sharedDefaultCache] storeImage:[image ZD_downSamplingForChat] forKey:key completion:nil];
});
[[ZDImageCacheManager sharedDefaultCache] storeImageDataToDisk:UIImageJPEGRepresentation(image, 1.0) forKey:[NSString stringWithFormat:@"%@%@", key, IMAGE_SUFFIX]];
|
这样既可以保证页面的流畅度,又可以减少内存的占用
图片预览
然后,当用户点击聊天列表中的图片消息时,会对图片进行预览,我们从磁盘缓存取出大图进行展示,当结束预览时,确保内存正常释放。